Add an Image to a Product
You can add one or more pictures to each of your products.
1. In the menu Products, click on "All products"
2. Select the product you want to add an image to.
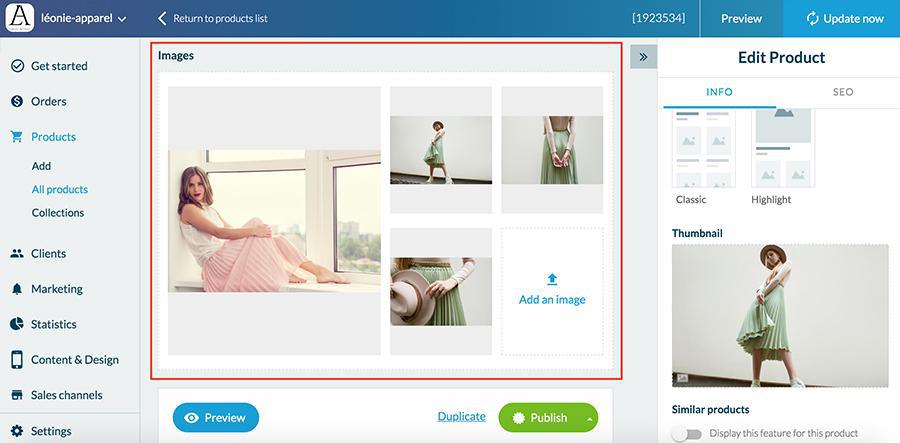
Once on the product page, you will find an image section. You can drop or upload an image from your computer.
To add another image, simply click on "Add an image".
You can add a maximum of 9 images per product. Your images will by default be displayed by order of upload.
You can sort your images by dragging them from one position to the other.
To find out more on how to create a product, refer to this online help: Add a new product

1. Select a Thumbnail
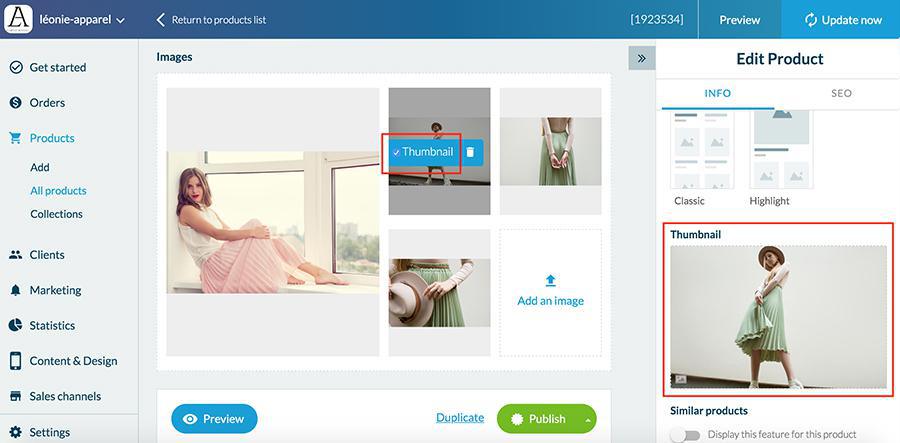
Once the images are added to your product, you can select one as the thumbnail. This image will be displayed in several parts of your shop such as the Home page, Collections pages, Cart or Checkout.
Warning, if your product has variants, in certain places the images used will be the ones associated with the variant.
For more information refer to this online help:
- Add product variant
- Add an image to a product variant
To select your thumbnail :
1. Hover your cursor on the selected image
2. Tick the checkbox next to "Thumbnail"
The image is now in your right menu under the "thumbnail" category.

Note: If you only have one image, it will be automatically selected as the thumbnail.

2. Adjusting the Thumbnail
Once you've set up the thumbnail, you can choose the image focal point:
1. In the right side menu, hover your cursor on the "Thumbnail" image
2. Click the blue square that just appeared on the image
3. A new window opens, click on the image to set up the focal point and the part visible once cropped.
4. Save your modifications by clicking the green "save" button


Related Articles
Add an Image to Product Varient
It is possible to associate an image with each product variant. You have two situations: - You've already created your variants - You have not yet created your variants Note: you can only assign images to your variants that are shown in the slideshow ...Add a New Product
You can add and manage your products from the Products menu in your back office. 1. Go to the menu Products > Add 2. Add a title and a short description of your product. 3. Add one or more images to illustrate your product 4. Define the ...Product Variants Management
You can add variants to your product if it comes in several options. You may offer your customers several options for the same product. For example, in the case of a clothing store, you will certainly be led to offer products in several sizes or ...Product Images - Tips
You will find below information regarding the images you wish to add to your products. - Maximun weight: 4Mo - No size restrictions - Recommended format: JPEG Warning: if you're adding multiple images to a product, the dimensions of the first image ...Select the Default Picture for a Product
When one of your clients opens a product page, an image from the slideshow is automatically selected. This is the default image which is not necessarily the one you're chosen as a thumbnail. 1. In the Product menu, click on "All products ". 2. In ...