Blog - CMS Article Section
Enhance your app with a blog to showcase your products from a different angle, by writing blog posts.
The Blog section allows you to showcase your products and organize a story around your shop. You can then keep in touch with your clients and increase your conversion rate by showing your expertise in your sector of activity while promoting your products.
An article CMS (Blog) section allows you to create and manage article content directly from the back office.
1. Add the Extension Blog
1. Go to the menu Extensions Store > All Extensions
2. Click the Blog extension
3. Click "Install"

New Blog menus and a blog section are added automatically:
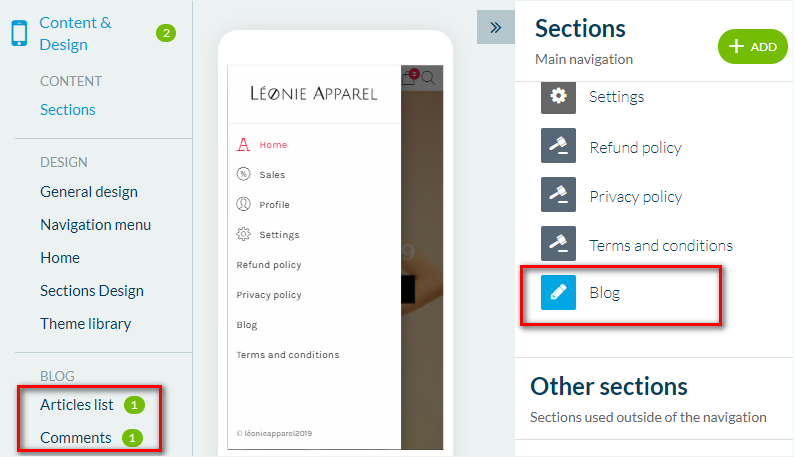
2. Add Content to your Blog Section
1. Go to the menu Content & Design > Other Content > Content list
2. Click "Add content"
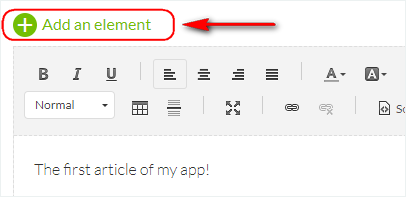
3. Add a title
4. Click the green button "Add an element" to add an extra text paragraph, a photo, a video, a quote, or a video code embed*

*The Embed option is made only for video embeds, the process is the same as adding an embedded video to a product page.
For other types of embeds, use a Text paragraph and select the Source button, then paste the HTML embed.
For other types of embeds, use a Text paragraph and select the Source button, then paste the HTML embed.
3. Info Tab
1. Go to the right column and click the tab Info
2. Select the section or category where your article will appear in the app.
The same article can appear in different sections or categories displaying the same type of content.
In this example, the article will be displayed in the section Blog (Main categories) and also in category 2.

3. Select the author of the article from the members of your team, or select the option "Free author" to enter a name manually.
4. Set the date displayed on the article.

Note: If you don't wish to display the author and/or the date of the article, please refer to this tutorial.
5. Optional: Pin this article at the top of the list in the sections and categories where it is published.

6. Set the thumbnail for your article (you must add a picture in your article for this option to be available)
7. Optional: write a summary for your article, which will appear on the list view of your articles depending on the template and the platform used.
8. Activate or deactivate the comments on this particular article
9. Optional: attach a PDF file to your article.

4. SEO Tab
Your PWA has been designed for optimal indexing in search engines:
1. Optional: edit the slug
2. Optional: edit the default title tag
3. Optional: edit default meta description tag
1. Optional: edit the slug
2. Optional: edit the default title tag
3. Optional: edit default meta description tag
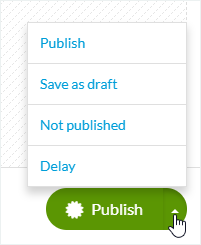
5. Publication Status
Click the arrow on the green button, at the bottom right of the writing form to set the publication status of your items:
-Publish: Your article will be visible immediately to your users.
-Save as Draft: Your article will be saved but not visible to your users.
-Not published: Your article will be saved but not visible to your users. This status can be useful to inform your team members that an article must be reviewed before publication.
-Delay: The publication of your article will be scheduled for the time and date you set
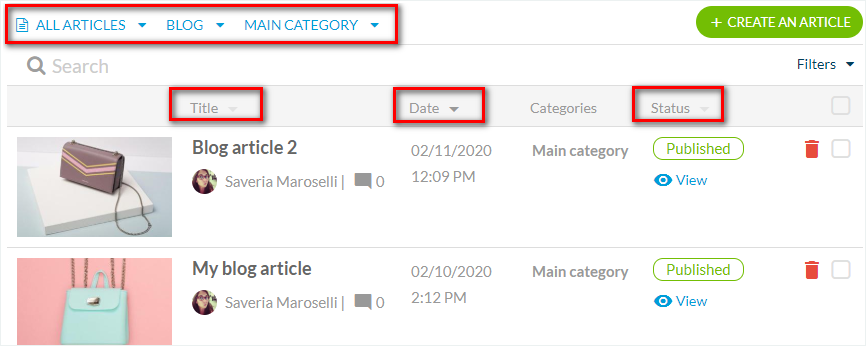
6. Search Items from the Content List
Go to the menu Content & Design > Other Content > Content list
1. Use the drop-down menus to search for your content:
- Type of content: select the type of items you're searching for (Articles or About pages)
- Sections
- Categories: you can select here the categories of the sections involved.
- Filters: display content depending on their publication status and/ or author.
- Search bar: search keywords in the titles of your content.
2. Organize your content*:
- alphabetically by clicking on Title
- by publication status by clicking on Status
- by date by clicking on Dates

*If you have pinned articles, they will stay at the top of the list while the rest of the content will be reorganized.
3. Use the search field to search by text within the titles of your items
7. Edit your Items from the Content List
1. Go to the menu Content & Design > Other Content > Content list
2. Check the boxes next to your item to:
- move one or several items to a different section or category
- change their publication status
- delete them in bulk
3. Click OK to confirm your choice.

Edit the publication status of 1 item from the content list:
1. Go to the menu Content & Design > Other Content > Content list
2. Search for your item
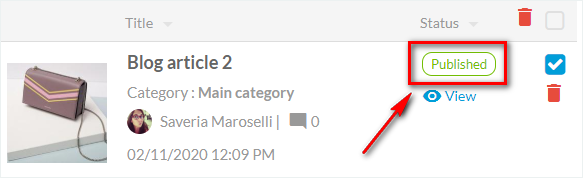
3. Click on the current publication status to change it.
8. Create a New Article
From the content list:
1. Go to the menu Content & Design > Other Content > Content list
2. Select the type of content
3. Click the green button +CREATE AN ARTICLE
From the Section:
1. Go to the menu Content & Design > Content > Sections
2. Click the 3 dots next to your blog section
3. Click "Edit the content"
4. Click the green button to add items at the top right of the screen

Related Articles
Content Management System (CMS) Section
1. Add CMS Section CMS sections allow you to create and manage your content directly from the back office. Add a new CMS section : 1. In the left swipe menu go to Content & Design > Content > Sections 2. Click the green button "Add a section" from ...Disqus Comments (Android & PWA only)
You can use Disqus to manage the comments on your CMS articles on your app. 1. Register your App on Disqus 1. Log in to your Disqus account 2. Add a new site to your Organization (please refer to Disqus documentation) 2. Get your Shortname on Disqus ...Add Category / Filter to your Sections
You can add categories to your CMS article or Map sections to organize your content in different categories within your sections or filter your external content when using an external source (WordPress). 1. CMS SectionsAdd a category: 1. In the left ...Blog - RSS Feeds / Wix Blog
1. RSS Feeds To connect your external articles (published online outside ) and display them in a section of your shopping app, is possible via an RSS section. RSS (RDF Site Summary or Really Simple Syndication) is a web feed that allows users and ...The Sections of the eCommerce App
1. Sections Management The Sections are the basis of your app. You can manage the sections of your application from the menu Content & Design > Content > Sections : The sections of your app are listed on the right side of the backend. Here you can ...