Chat Add - ons
The Chat extension is a one-to-one messaging service.
All users can send messages to each another (not photos, videos, emojis, or URLs, only plain text).*
This add-on is free up to 5000 registered users (if you have more registered users, please contact the support).

*If you're looking to add a chat to your app to talk with your users, ideal for support to answer your users' questions by chat, go for Tawk.to extension instead.
Activate the chat:
1. Install the Authentication Extension and the Community Extension.
2. Go to the menu Extensions Store > All Extensions
3. Click the "Chat" extension or search for it in the search bar
4. Click the green button "Install"

1. Chat Section
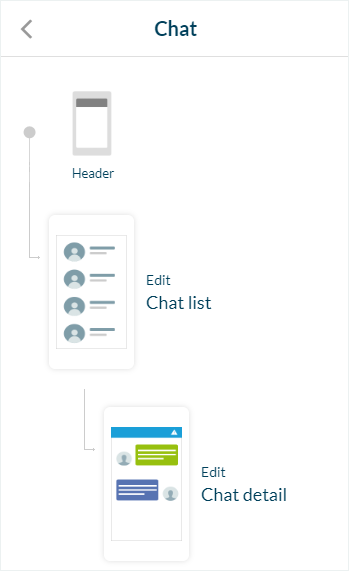
A new Chat section is added to your section list in the menu Design & Structure > Structure > Sections
To edit the design of the list and detail templates and header of this section:
1. Click the 3 dots next to your section chat
2. Click "Modify Design"
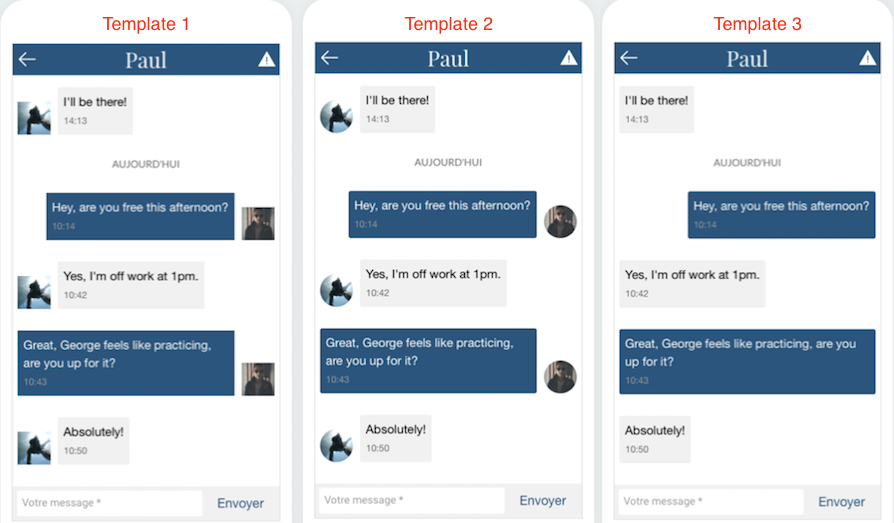
Choose from 3 different templates for the list and detail views of the Chat section*.

*The list and detail templates are independent from each other, you can combine them:
For instance, you can select template 1 for the list view, and template 3 for the detail view.
2. Chat Detail Templates
- Detail Template 1 displays square photos and square message boxes.
- Detail Template 2 displays rounded photos and square message boxes.
- Detail Template 3 displays no photos and square message boxes.
3. Chat List Templates
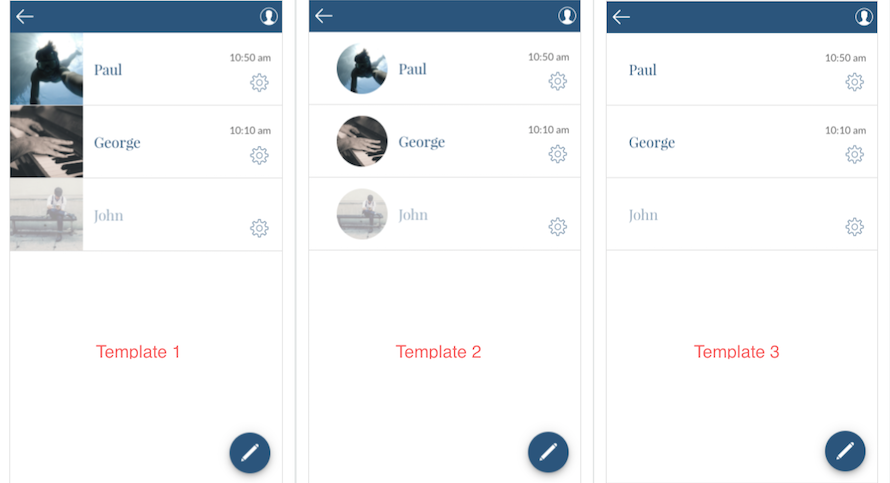
List Template 1 displays:
- all the received messages (less recent to most recent one),
- the name and picture of the contact (or the default picture, if the user doesn't have an avatar),
- the date of the last message,
- the write button.
List Template 2 displays:
- all the received messages (less recent to most recent one),
- the name and picture of the contact (or the default picture, if the user doesn't have an avatar),
- the date of the last message,
- a bullet indicating there is a new unread message at the left of the picture
- the write button.
List Template 3 displays:
- all the received messages (less recent to most recent one),
- the name of the contact (no picture),
- the date of the last message,
- a bullet indicating there is a new unread message at the left of the picture
- the write button.
4. Send a Message to Another User
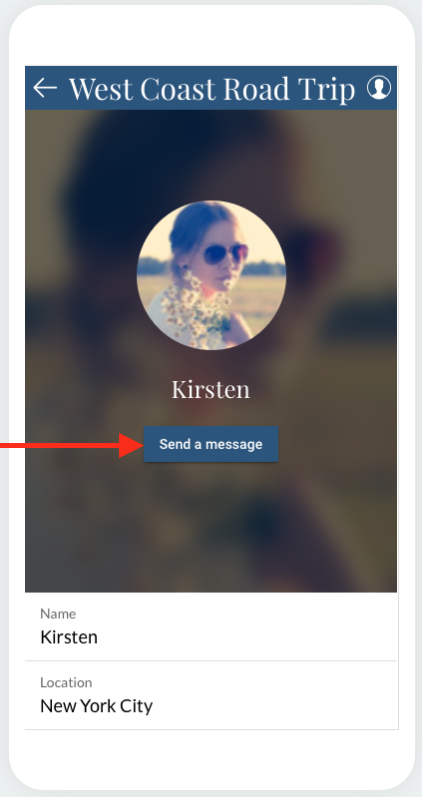
To send a message to another user of the app, select his profile in the Users page of the app, and inside his profile, click on the "Send a message" button.
5. Activate / Deactivate the Possibility to be Contacted by Other Users
The profile of the app users is public by default, to choose to not be contacted by other users:
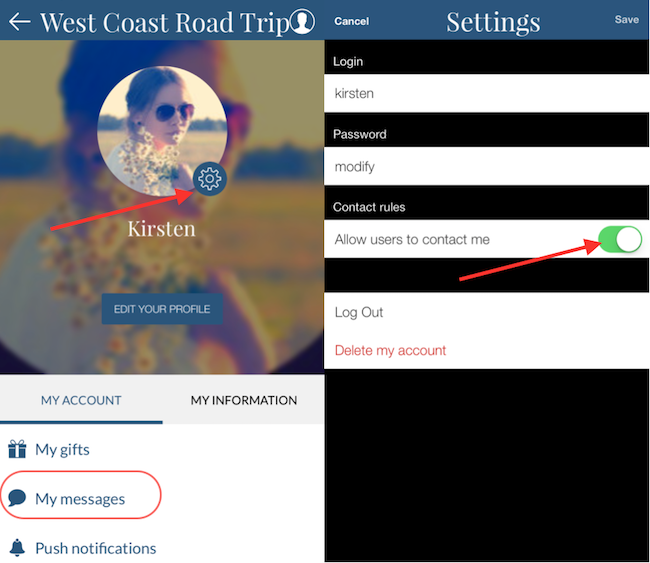
1. From the app, go to their own Profile page > My messages
2. Set the "Allow users to contact me" button to "OFF".
When a user does so, the "Send a message" button disappears from their public profile.

Note: Previous received messages are still visible in "My Messages", and it is possible to keep on sending messages into the existing conversations.
6. Block / Unblock Users - Mark Messages as Read - Delete a Conversation
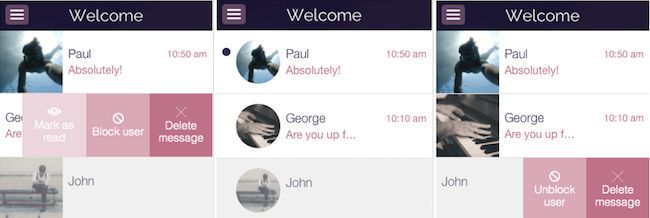
When viewing the list of messages, swipe left on a conversation to access the different options described below:
- Block user
You won't receive any further message from the blocked user.
The blocked user doesn't know he has been blocked (he can keep on sending messages to you, but you won't receive them).
The conversation you had with the blocked user is stocked at the bottom of the list of conversations, and the conversation is grayed out.
- Unblock user
You can now receive messages again from the user who was previously blocked.
If the user sent you messages while he was blocked, you can now see these messages in the conversation.
- Mark as read (only with the List Templates 2 & 3)
When you mark the conversation as read, the bullet indicating you have a new message will disappear.
- Delete message
This action deletes the whole conversation you have with this contact.

Warning:
If you blocked a user and delete the conversation, you can no longer unblock this user!
If you only delete the conversation, if you reopen it, your previous messages will be displayed again.
Related Articles
Switch between User / Local Business Add-ons and In-App Purchase Add-ons
1. Switch from Users & Local Business Add-ons to In-App Purchase Add-ons In-app purchase add-ons is not compatible with the following add-ons Users: Authentications, Community, User groups, chat Local business: Loyalty card, Club card and Couponing - ...In - App Purchase Add-ons Description
1. In-App Purchase Add-ons Overview In-App Purchase add-ons allows you to sell auto-renewable subscriptions from your native apps via the App Store (Apple) and Google Play Store to monetize your app. The subscriptions will be paid and managed ...User Groups Add-ons
1. Install the User Groups Add-ons The User Groups add-ons allows you to manage your users by personalizing their access rights for each section of your app. This add-ons is free. Requirements for the activation: - Authentication add-ons installed ...Authentication Add-ons
1. Activate the Authentication Add-ons 1. Go to the menu to Add-ons Store > All Add-ons 2. Scroll to the Authentication add-ons or search for it in the search bar 3. Install it from the Add-ons store by clicking on the "Install" green button. 2. ...Create a Test User Account (Required to publish on the Stores)
1. Create a New User If you have the authentication activated in your application, a Test User Account will be necessary for granting Apple's review team full access to it. If Apple cannot access all the content of your app, your app will immediately ...