CMS - Calendar (Events)
With calendar sections, keep your users informed of all upcoming releases, partnerships, or events.
It is possible to plan in advance all your publications by indicating the date and time you want, to avoid any delay and to ensure optimal organization.
It is possible to plan in advance all your publications by indicating the date and time you want, to avoid any delay and to ensure optimal organization.
1. Add a Calendar Section
1. In the left swipe menu go to Content & Design > Content > Sections
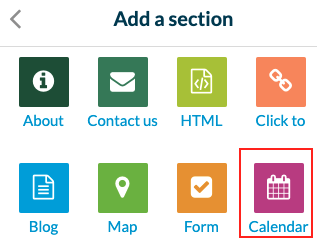
2. Click the green button "Add a section " from the right column
3. Add a calendar section by choosing "Calendar" from the available options
4. Give it a title > Click "Add"

Note: When a section calendar is created, it automatically creates an Event widget on your home page.
2. Add an Event
1. Click the 3 dots in your sections list, then "Edit the content"

2. Click the green button "Create an event" in the main column
3. Give it a title
4. Set the starting time and date, the ending time and date, and the location (optional).
5. Tick the box "all day" to display only a date and no starting or ending time for your event (optional)
6. Add a description for your event and other elements if needed


Must know:
All events are displayed in the content list of your back office (even when they are over).
However, past events will automatically disappear from the app. Your users can only see current or future events.
All events are displayed in the content list of your back office (even when they are over).
However, past events will automatically disappear from the app. Your users can only see current or future events.
3. Info Tab
1. Go to the right column and click the Info tab
2. Select the section or category where your event will appear in the app.
3. Set the action buttons:
- Call a telephone number
- Write an email
4. Set links to:
- A website URL (Other information)
- A URL to buy tickets (Ticketing service)

4. SEO
1. Optional: edit the slug
2. Optional: edit the default title tag
3. Optional: edit default meta description tag
5. Publication Status of your Event
The button at the bottom right of the screen allows you to select the publication status of your event:
-Publish: Your event will be visible immediately to your users.
-Draft: Your event will be saved but not visible to your users.
-Not published: Your event will be saved but not visible to your users. This status can be useful to inform your team members that an article must be reviewed before publication, for example.
-Delay: The publication of your event will be scheduled for the time and date you set.

6. Settings of the Calendar Section
To edit the settings of your Calendar page, refer to this online help: Settings of the pages.
7. IMPORTANT
The time zone of reference for your events is the one you set in your profile (My profile > My account).
From this time zone, your app will update the event times depending on where the telephone/computer of your users is.
Example:
You set at 11 am an event with (UTC +1) Paris France time zone as a reference for the admin creating the event.
Your app will "transform" that time to whatever time it is, in the time zone the device using the app is:
- Users in New York, New York, USA (UTC -5): will see the event at 5 am
- Users in Tokyo, Japan (UTC +9): will see the event at 7 pm

Related Articles
Content Management System (CMS) Section
1. Add CMS Section CMS sections allow you to create and manage your content directly from the back office. Add a new CMS section : 1. In the left swipe menu go to Content & Design > Content > Sections 2. Click the green button "Add a section" from ...iCal / vCal Calendar Section
You can connect an external calendar source to your app and keep your users informed of all upcoming releases, partnerships, or events. Note: - Muse mBaaS apps don't display past or recurrent events, this applies to all sources. - If you have ...The Sections of the eCommerce App
1. Sections Management The Sections are the basis of your app. You can manage the sections of your application from the menu Content & Design > Content > Sections : The sections of your app are listed on the right side of the backend. Here you can ...CMS - Video (Web Tv)
1. Add a CMS video section1. In the left swipe menu go to Content & Design > Content > Sections 2. Click the green button "+ Add a section " from the right column 3. Add a video section by choosing "WebTv" in the content items. 4. Give it a ...CMS - Photo (Gallery)
1. Add a CMS Photo Section 1. In the left swipe menu go to Content & Design > Content > Sections 2. Click the green button "+ Add a section " from the right column 3. Add a photo section by choosing "Gallery" in the content items. 4. Give it a ...