Content Management System (CMS) Section
1. Add CMS Section
CMS sections allow you to create and manage your content directly from the back office.
Add a new CMS section :
1. In the left swipe menu go to Content & Design > Content > Sections
2. Click the green button "Add a section" from the right column
3. Select the type of CMS section:
- Blog for articles
- Gallery for photos
- Web TV for videos
- Map for locations
- Calendar for events
- Podcasts for audio files
2. Create your Content
Depending on the chosen type of CMS section, you will be able to add specific content.
All CMS sections, except for the Gallery are made of a title plus different paragraphs (text, image, video embed etc..)
You can manage the layout of your paragraphs using these different tools:
1. Bold, Italic, Underlined
2. Paragraph alignment
3. Color and highlight color
4. Quotes, bullets...
5. Paragraph format
6. Creating a table or separating line
7. Full-page display
8. Adding a link (to an external URL or another page in the application), deleting a link
9. Icon source in the toolbar allows you to enter the HTML code that will be read by your app. The entire paragraph will be in HTML format.
10. Delete the formatting.

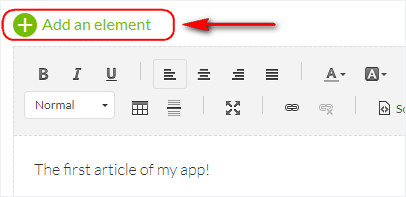
- Click the green button "Add an element" to add a text paragraph, a photo, a video, a quote, or a video code embed*

*The Embed option is made only for video embeds.

For other types of embeds, use a Text paragraph and select the Source button, then paste the HTML embed.
More detailed information in online help how create links and embeds.
3. Info Tab
1. Go to the right column and click the tab "Info"
2. Select the section or category where your item will appear in the app*
The same item can be displayed in different sections or categories displaying the same type of content.
In this example, the article will be displayed in the section Before you go (All categories) and also in category 2.

3. Select the author of the item from the members of your team, or select the option "Free author" to enter a name manually.
4. Set the date displayed on the item's page.
5. Optional: Pin this item at the top of the list in the sections and categories where it is published*

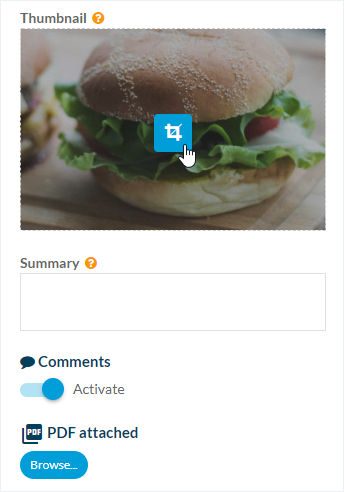
6. Set the thumbnail for your item (you must add a picture in your item for this option to be available)
7. Optional: write a summary, which will appear on the list view of your items*
8. Activate or deactivate the comments on this particular item
9. Optional: attach a PDF file*
*Options can differ depending on the type of CMS section you're setting.
4. SEO Tab
1. Edit the slug of your item page
2. Edit the default title tag of your item page
3. Edit the default meta description tag of your item page
5. Publication Status
Click the arrow on the green button, at the bottom right of the writing form to set the publication status of your items:
-Publish: Your article will be visible immediately to your users.
-Draft: Your article will be saved but not visible to your users.
-Not published: Your article will be saved but not visible to your users. This status can be useful to inform your team members that an article must be reviewed before publication.
-Delay*: The publication of your article will be scheduled for the time and date you set
*Depending on the type of section, this status may not be available

6. Manage your CMS content
To access your CMS content list:
1. Go to the menu Content & Design > Content List
or
2. Go to the menu Content & Design > Content > Section
3. Click the 3 dots next to the section involved
4. Click "Edit the content"
1. Go to the menu Content & Design > Content List
or
2. Go to the menu Content & Design > Content > Section
3. Click the 3 dots next to the section involved
4. Click "Edit the content"
7. Search Items from the Content List
Go to the menu Content & Design > Content List
1. Use the drop-down menus to search for your content:
- Type of content: select the type of items you're searching for (articles, videos, photos, sounds, maps, forms, submitted content, contact page or events).
- Sections:
- Categories: you can select here the categories of the sections involved.
- Filters: display content depending on their publication status and/ or author.
- Search bar: search keywords in the titles of your content.
2. Organize your content*:
- alphabetically by clicking on Title
- by publication status by clicking on Status
- by date by clicking on Date
*If you have pinned articles, they will stay at the top of the list while the rest of the content will be reorganized.
3. Use the search field to search by text within the titles of your items

8. Edit your Items from the Content List
1. Go to the menu Content & Design > Content List
2. Check the boxes next to your item to:
- move one or several items to a different section or category
- change their publication status
- delete them in bulk
3. Click OK to confirm your choice.

Edit the publication status of 1 item from the content list:
1. Go to the menu Content & Design > Content List
2. Search for your item
3. Click on the current publication status to change it.

9. Create a New Item
From the content list:
1. Go to the menu Content & Design > Content List
2. Select the type of content
3. Click the green button +ADD
From the Section:
1. Go to the menu Content & Design > Content > Section
2. Click the 3 dots next to your section
3. Click "Edit content"
4. Click the green button to add items at the top right of the screen

Related Articles
The Sections of the eCommerce App
1. Sections Management The Sections are the basis of your app. You can manage the sections of your application from the menu Content & Design > Content > Sections : The sections of your app are listed on the right side of the backend. Here you can ...Blog - CMS Article Section
Enhance your app with a blog to showcase your products from a different angle, by writing blog posts. The Blog section allows you to showcase your products and organize a story around your shop. You can then keep in touch with your clients and ...CMS - Photo (Gallery)
1. Add a CMS Photo Section 1. In the left swipe menu go to Content & Design > Content > Sections 2. Click the green button "+ Add a section " from the right column 3. Add a photo section by choosing "Gallery" in the content items. 4. Give it a ...CMS - Video (Web Tv)
1. Add a CMS video section1. In the left swipe menu go to Content & Design > Content > Sections 2. Click the green button "+ Add a section " from the right column 3. Add a video section by choosing "WebTv" in the content items. 4. Give it a ...CMS - Podcast / Sound Sections
This CMS section allows you to upload your sound files directly into your backend Muse mBaaS to display them in a sound section. 1. Add a New Podcast Section 1. In the left swipe menu go to Content & Design > Content > Sections 2. Click the green ...