"Estimote" Beacons
1. The Estimote Brand and Its Application
When you receive your Estimote order, your beacons will have already been assigned the same UUID and different Major / Minor parameters. However, these are default UUID and Major/Minor settings. We suggest that you modify this value, taking into account the format given previously. Attention: usually the UUID must be identical for all of the beacons owned by the same person/business. Therefore, you cannot enter just one, unique UUID in your back office. So, be careful to give the same UUID to all of your beacons.
Then download the Estimote application on your phone or tablet :
- Apple Store (iPhone / iPad) : https://itunes.apple.com/fr/app/estimote/id686915066?mt=8
- Play Store (phones and Android tablets) : https://play.google.com/store/apps/details?id=com.estimote.apps.main&hl=fr
The following screenshots show the application on an iPhone, but the procedure is exactly the same for an Android.
Before getting started, remember to activate the bluetooth on your device.
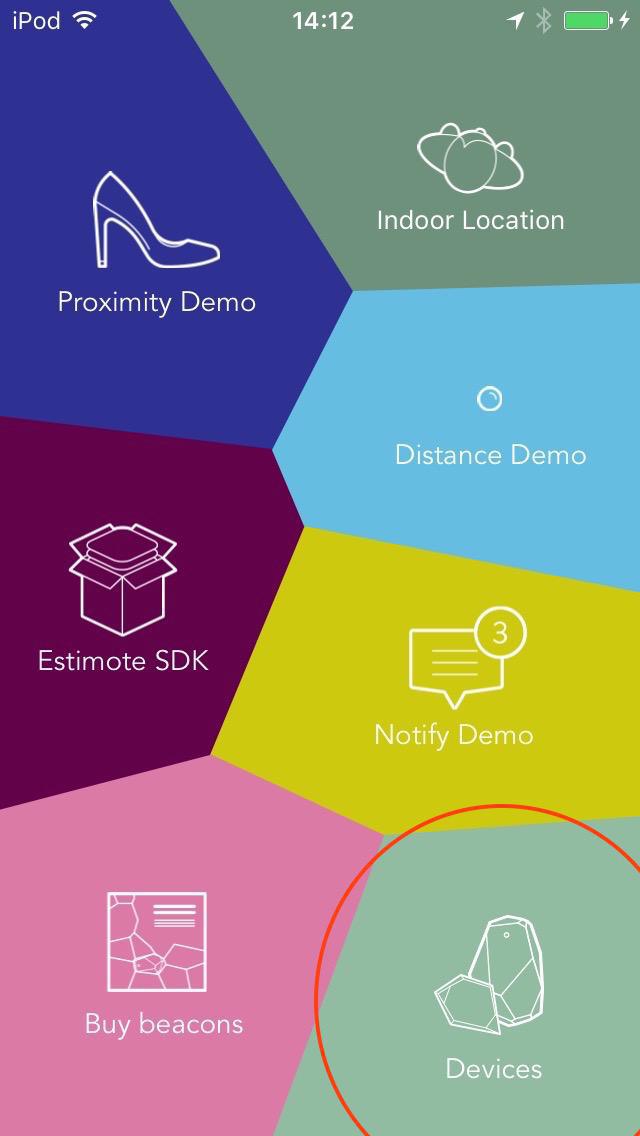
Open the application and then click on the "Devices" part at the bottom right of the home page.

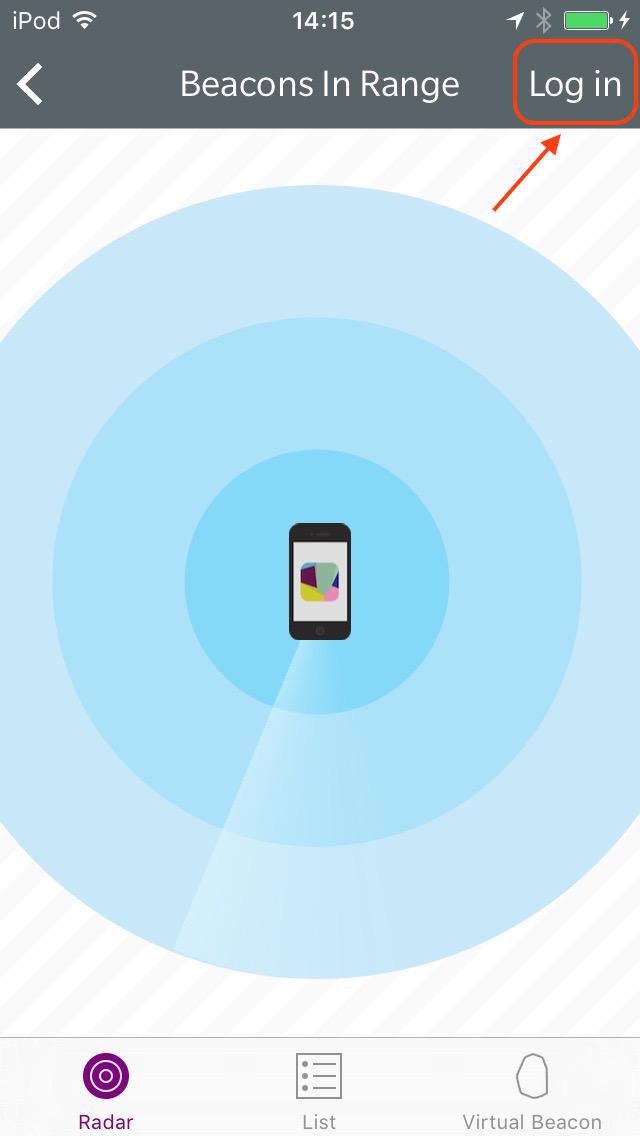
Then click the "Login" button at the upper right of the screen, as indicated in the screenshot below.

2. Login
You will arrive to a page in which you must enter your Estimote account credentials in the dedicated fields, then click the "Login" button.

3. Access the List of Beacons
You have two possible choices for displaying the beacons surrounding you :
- "Radar" display : this is the first tab, at the bottom left of the screen, like shown in the first screen shot below ;
- "List display " this is the middle tab, like shown in the second screenshot below.
- "Radar" display : this is the first tab, at the bottom left of the screen, like shown in the first screen shot below ;
- "List display " this is the middle tab, like shown in the second screenshot below.


4. Getting the UUID, Major and Minor
Whether you have opted for radar or list display, you should now click the beacon you want in order to access its detailed file.

Here you will find information that will be useful when creating your push notification, namely :
- UUID ;
- Major ;
- Minor.
/! You will need this information for creating the beacon your notification will be based on.
If you want to modify the default values, you must :
- Click on the concerned field, the UUID, major or minor ;
- Enter a new value ;
- Click on the return arrow at the top right of the screen.
5. [OPTIONAL] Extra Configuration
/! Modification of the following settings affects the energy consumption and therefore the battery life
You also have two options for adjusting the configuration based on your needs :
- Setting the transmission power : the value of the "Power Level" section is programmed to 3 by default, but you can increase it. Such a modification is useful if your beacon is situated in the middle of a crowded space, in obstacles, or just if you want to be sure that your beacon emits as much as it can. On the other hand, according to the usage of your beacon, it can be wise to turn down this setting in order to save battery ;
- Setting the "Advertising Interval" : this is the frequency at which the beacon signal is emitted. Like in the previous case about the emission power, it's up to you to decide how useful such a modification is according to the usage conditions of your application and the placement of beacons in the environment.

6. Create a Notification Based on a Beacon in Muse mBaaS
1. Activate the "Beacon" extension
2. Fill in the UUID field of the beacons you won, by going to your back office, in the menu Notification > Geoalert
3. Click on iBeacons as shown below.
The "Beacon layout" is a fixed value, defined according to the brand of your beacons, in the case of Estimote beacons, it will always be : ""m:2-3=0215,i:4-19,i:20-21,i:22-23,p:24-24".
4. Click "Save"


7. Create a beacon by indicating its major and its minor.
8. Click Add: your beacon is now ready.
8. Click Add: your beacon is now ready.

Related Articles
Beacons (Native Apps Only)
1. What is a beacon? A beacon emits a Bluetooth Low Energy signal, being Bluetooth 4.0, that consumes very little power, especially compared to previous versions. They give the option to define a radius in which the user can receive a notification. A ..."Kontact" Beacons
1. The Kontact Brand and Its Application As soon as you receive your Kontact order, the group of beacons received will already be programmed with the same UUID, and different Major/Minor parameters. However, these are default UUID and Major/Minor ...Geofences (Full & Premium Plan Only)
The Geofencing extension allows you to define geographical areas within which the dispatch of notifications to your app users will be automatic for native apps only. You have 3 geofences included with the Full plan and above*. You can buy extra ...Request Access to Location in the Background for your Geofences - Android
Since October 2020, to use the location in the background on Android app (meaning the app will keep locating the final user even if the app in not active but only running in the background of the user’s phone) Google must allow it. For this you must ...Push Settings on Users Side | Native Apps
1. Install the Authentication Extension 1. Go to the menu Extensions Store > All extensions 2. Click "Authentication" extension. 3. Click "Install" 2. Push Notifications History Users are able to see push notifications history in their profile page. ...