How to use Push Notifications | PWA
Standard plan (PWA only): 500,000 push notifications per month ( = 1 notification per month if you have 500,000 users, 10 notifications per month if you have 50,000 users, 100 notifications per month if you have 5,000 users, etc.)
Full plan (PWA, Android apps): 2,000,000 push notifications per month.
Premium plan (PWA, Android and iOS native apps): push notifications are unlimited.
If you have reached your push notification quota, you can add supplemental notifications by clicking "Add notifications "

1. Send Push Notifications
1. Go to the menu Notification > Push > Send .
2. Type your message into the designated field*

*A push notification is meant to be short, so the field is limited to 130 characters

Important: Only users who have agreed to receive push notifications when using your Progressive Web App (PWA) will receive them.
2. Action upon Opening Notification
The dropdown menu "Select an action" allows you to determine the action that will take place when the push notification is opened:
- Open the application: the user will open the home page of your PWA
- Open an external link: the user will open his browser, where the indicated link will be opened.
- Sections: the user will arrive directly to the selected page of your PWA.
- Open the application: the user will open the home page of your PWA
- Open an external link: the user will open his browser, where the indicated link will be opened.
- Sections: the user will arrive directly to the selected page of your PWA.
3. Schedule the Dispatch Time
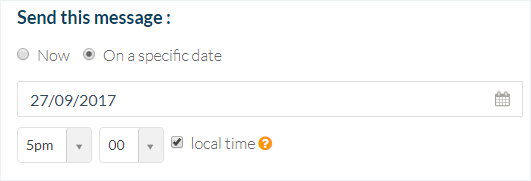
You have the option to send a push notification immediately or to delay it.
1. Select the option "On a specific date"
2. Define the date and time the push notification will be sent*
You will find notifications scheduled for a precise date in the tab Notification > Push > Schedule .

*Check the option "Local time" if you want all of your users to receive the push notification at the same time of their day (when waking up, at lunch time, bedtime, etc.).
The notification will be sent at the chosen time and will respect the different time zones of your users.
A notification sent at 9 AM local time will be received at 9 AM for all of your users, whether they are in Paris, New York, Moscow, Tokyo...
Attention, this type of notification must be scheduled at least 24 hours in advance! It is not possible to schedule a local time push notification for the same day.

4. Push Notification History
Go to the menu Notification > Push > History
You will find a list of sent notifications. They are divided into two categories: Manual and Scheduled.
The history provides some information concerning your push: title, origin, date of dispatch of your message.
The number under the statistics icon is your push ID if you need to exchange with the technical support.
Stats icon is clickable to get some stats by push.
The Status column is filled in with colored badge indicating the current status of your notification:

* BLUE: The notification has not yet been sent to the recipients
* GREEN: The notification has been sent to the recipients
* RED: The notification has not been sent
* GREEN: The notification has been sent to the recipients
* RED: The notification has not been sent
5. PWA Push Specification
PWA push notifications can be received in the following browsers:
- Chrome Desktop
- Chrome Android
- Firefox Desktop
- Firefox Android
- Opera Desktop
- Opera Android

Attention: For now, Apple does not support push notifications in any iOS web browser (mobile).
Must know: If you test the push notifications on your PWA, you must use 2 different browsers.
- One browser to display your back office to send the push.
- The browser you're testing with the PWA opened, where you accepted the notifications.

Why? Because you use the same domain on your PWA and your back office, if the backend receives the push instead of the PWA, the notification will not be displayed since the back office isn't a PWA.
Related Articles
Scheduled Push Notifications | PWA
This feature allows you to schedule push notifications to be sent automatically when new content is published in a specific section of your app. This is a different feature than the regular push, which allows you to send pushes manually one at the ...How to use Push Notifications | Native Apps
Push notifications allow an app to notify users of new messages or events without the need to actually open the application, the same way a text message will sound and appear on the user's screen. This is a great way to interact with your users. With ...Scheduled Push Notification | Native Apps
This feature allows you to schedule push notifications to be sent automatically when new content is published in a specific section of your app. This is a different feature than the regular push, which allows you to send pushes manually one at the ...Push Notifications-Troubleshooting | Native Apps
If you notice that a push was not sent out, start by checking the push history list. You can find it under the menu Notification > Push > History . If the status is green, this means that the push was sent to your users properly. If you have an ...SMS Notifications
1. Activate the SMS Notification Extension 1. Go to the menu Extensions store > All extensions :: SMS Notifications 2. Click "Install" Activating this extension is free, and available only with the Progressive Web App (PWA) version of your app. It ...