Navigation Menu
The Navigation Menu allows displaying the main navigation menu of the app.
It allows for links to direct the user toward the content of your app and/or actions.
When you create a new section in your app, a link opening this section is automatically created in your navigation menu.
To set up your Navigation menu:
1. Go to the menu Design & structure > Structure > Sections
2. Click "Menu " from the right panel.

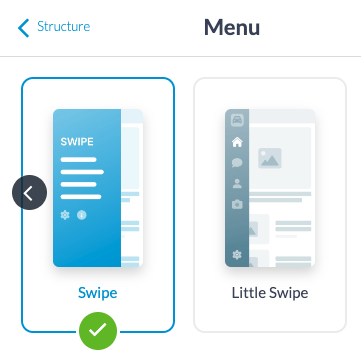
1. Template Choice
1. Click Select under the template of your choice for your navigation menu in the right column of your back office
The template applied is shown in Green.
Choose between different navigation menus:
- Swipe, Little Swipe, Grid, Slate, and From Scratch are accessible from a button in the header of the application.
This button is displayed on content pages accessible from your navigation menu (unless you set your menu always be visible on the web app, or to be displayed upon launching, depending on the options available).
- TabBar is displayed at the bottom of the screen on native apps, and as a banner on the web app under the header.
The TabBar is displayed on content pages accessible from your navigation menu.
The TabBar is displayed on content pages accessible from your navigation menu.
- "No menu" allows you to not display any navigation menu in your app.
- From Scratch is not a template; it allows you to create a navigation menu yourself in HTML.
Note: Depending on the chosen navigation mode, the title of your sections shouldn't exceed a certain number of characters (or the end may be cut):
- Grid: 13
- Slate: 20
- Little Swipe: 12
- Others: 32
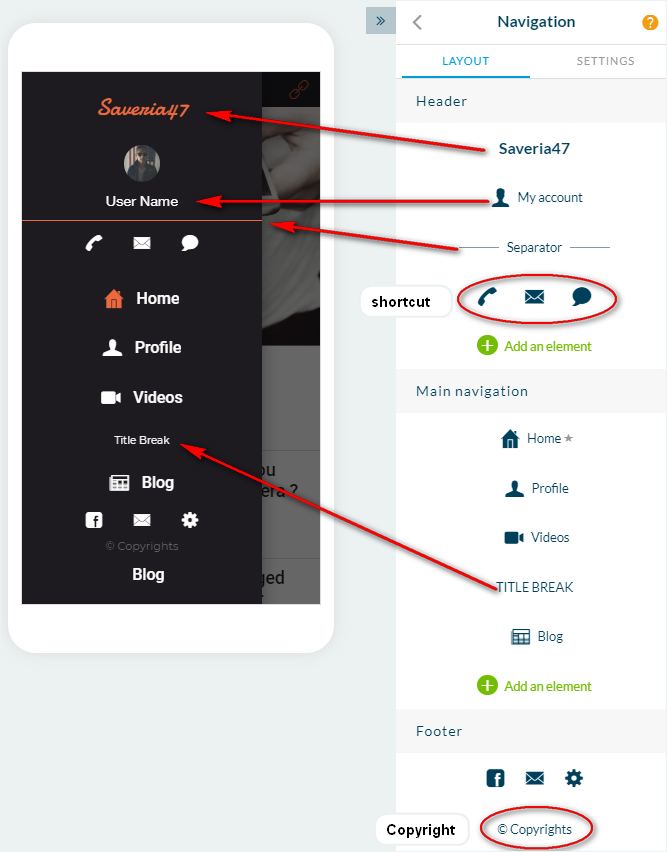
2. Build your Menu
1. Click "Edit" under your template or select a new template
2. Click the green "+ Add an element" button to add an element* to your menu.

*The elements

- Separator: design element to mark a separation
- Title break: allows you to insert a title
- Link: directing to a page, action, or external link
- Shortcut: a group of links
- Logo: element allowing you to title or display an image
- My account: element pointing to the user's profile page
- Copyright: element allowing you to display static information
Depending on the navigation menu you choose, the elements can be placed in different areas of the menu.
Swipe, Little Swipe, Grid, Slate
These navigation menus are divided into three areas that can hold elements.
- Header: used to give a title to the navigation page, display a user account, links, and shortcuts
- Main navigation: the main area of the navigation menu. Contains separators or title breaks
- Footer: at the bottom of the page, it's used to display the user's account, the copyright, links, and shortcuts
TabBar
This navigation menu is split into two areas that can hold elements.
- TabBar: add up to 5 links here
- "Others" menu: With more than five links in the menu, the last position of the TabBar becomes the "Others" menu.
It allows access to add links.
No menu
Select this menu to not display any navigation in the app and instead choose the section which will be displayed when the app is opened.
From scratch
Reserved for developers, select the "From scratch" menu to construct your own navigation in HTML.
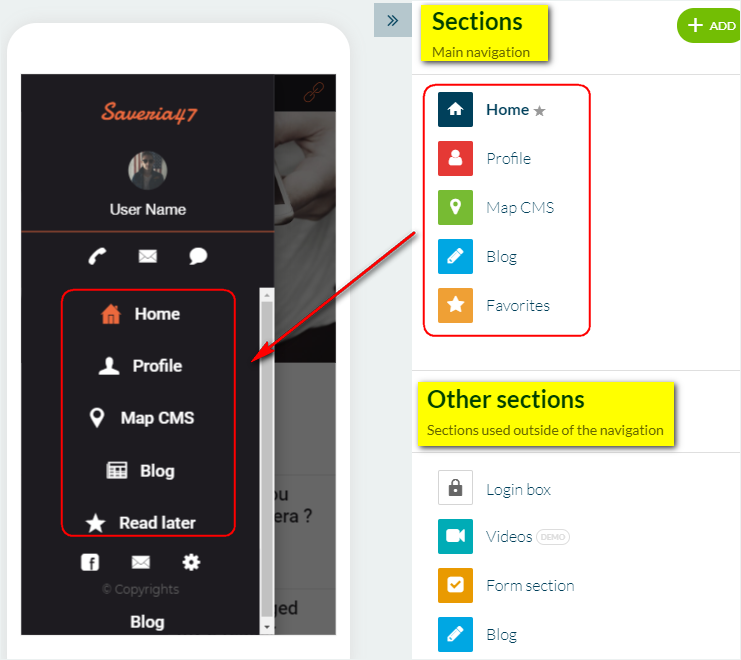
3. Links to your Sections in the Navigation Menu
1. Go to the menu Design & Structure > Structure > Sections
2. Drag and drop your section to the "Main navigation" or the menu below "Other sections"
The top menu Sections - Main navigation is the list of the sections which are displayed in the main navigation menu of your app.
The order of the sections is the same as for your menu:
- Order your sections from the navigation menu settings or from your sections list by drag and drop.
The bottom menu Other sections - Sections used outside of the navigation is the list of the rest of your sections, which do not appear in the main navigation menu of the app.
4. Create Links in the Navigation Menu
To create a link directly in the Main pages part of your navigation menu:
1. Go to the menu Design & Structure > Structure > Sections
2. Add a Click-to section, which behaves the same way as a link.
To create a link in the Footer of your navigation menu:
1. Go to the menu Design & structure > Structure > Sections
2. Click "Menu " from the right panel
3. Click the green "+Add an element"
4. Choose the "Link" element in the popup that will appear
Once the link is added to your menu, click on it to set it up :
- Title: this is the text that appears in your menu
- Link: this is the destination your link points to
- Feature this link: this option allows you to apply colors and a specific font to the link.
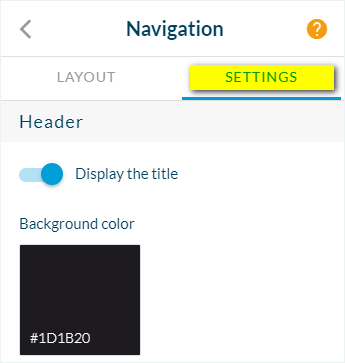
5. Navigation Menu Settings
Manage the display options in each of the areas of your navigation menu.
1. Go to the menu Design & structure > Structure > Sections
2. Click "Menu " from the right panel
3. Click the tab "Settings "
4. Set by zone (Header, main navigation, and footer):
- Alignment: vertical and horizontal position of the elements of the menu
- General background: a color or an image
- Images/fonts and color: display a background image in the area, define the default colors of the active and inactive elements
- Options: depending on the template, you can choose to hide or display by default the navigation menu.
Related Articles
Navigation Menu (eCommerce App)
The Navigation Menu allows displaying the main navigation menu of the app. It allows for links to direct the user toward the content of your app and/or actions. When you create a new section in your app, a link opening this section is automatically ...Section Design
By default, your application has a global style applied to all your app's pages. To modify colors, fonts, backgrounds, formats, etc... of each element of your application: 1. Go to the menu Design & Structure > Structure > Sections, which will show ...Customize the Icons of your Navigation Menu
When setting your navigation menu, you can choose to display icons. Those icons can be displayed in your shortcuts, or in the main navigation, depending on the template you chose. To set your navigation menu: 1. Click "Menu " from the right panel ...Customize the Icon of your Navigation Menu (eCommerce App)
When setting your navigation menu, you can choose to display icons. Those icons can be displayed in your shortcuts, or in the main navigation depending on the template you chose. To set your navigation menu: 1. Click "Menu " from the right panel in ...Design the Categories of your Section
Depending on the type of content you have on your app, you can add categories to your CMS content section or filter your external content when using an external source (Youtube, WordPress etc.). Please refer to this online help for more ...