Community Add - ons
The Community extension will allow you to view list of subscribed users within the app. This means that your users will also be able to see who has registered within your application.
You must first install the Authentication Extension as a prerequisite:
1. Go to the menu Extensions Store > All Extensions
2. Click the "Community" extension or search for it in the search bar.
3. Click the green "Install" button.

1. New Users Section
A new "Users" section is added to the left menu > Design & Structure > Structure > Sections.
In this section, logged in users will be able to see the list of other registered users in your application.
The profile is public, which means that all filled in information is visible by everyone.
To set your Users section:
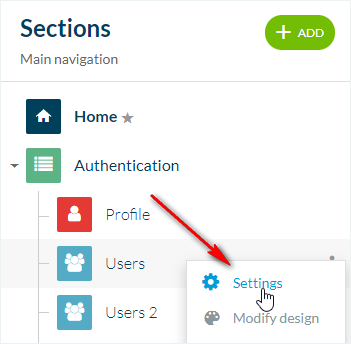
1. Go to the menu Design & Structure > Structure > Sections
2. Click the 3 dots next to your User section
3. Click Settings.
From this menu you can:
- Enable the Search feature in this User section
- Set filters to select which group of users will be displayed in this section
- Set where to place the section in your app tree structure
- Make the section private
- Hide the section
- Edit the url of the page's section

2. Design of your User List Section
1. Go to the left menu > Design & Structure > Design > Sections
2. Click on your Users section.
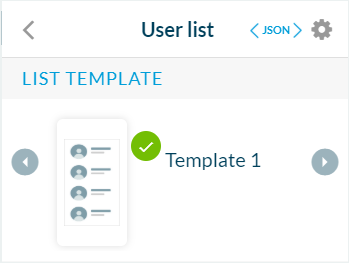
3. Click Edit User list, to choose between two templates.
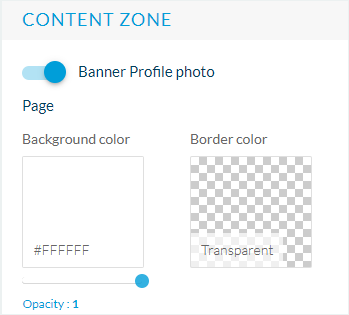
4. Set your content zone colors and fonts.
5. Activate/Deactivate the user thumbnail* and map view**.

*Note: The user thumbnail can only be deactivated with Template 1.

**Note: Map view is only available to native plans.

6. In the "List options" block, you can activate up to 3 classification tabs.
- Recent: displays by default the last 24 users who have recently logged in
- Nearby: displays by default the 24 users who are the closest to your location (only available for Native plans)
- All: All the users, in alphabetical order
You can choose to keep only two tabs instead of the three suggested ones. You can also deactivate the classification altogether.
If you select only one tab by choosing for instance the nearby users, users will be classified according to distance. The "Nearby" tab will not be visible for aesthetic purposes.
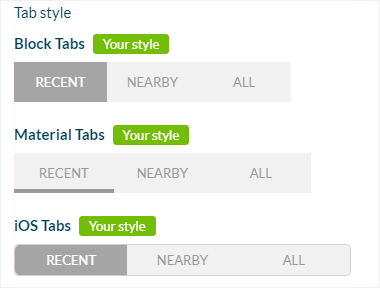
Edit the style of the tabs according to three display options:
- Block Tabs
- Material Tabs
- iOS Tabs
7. In the Thumbnail block, upload a default thumbnail of a minimum size of 516 x 291 pixels which will show in the list as the thumbnail for users who haven't uploaded a profile picture.

3. Design of the Public Profile Section
1. Go to the left menu Design & Structure > Design > Sections
2. Click your users section
3. Click Edit Public Profile, to edit the design of the profile section of your users.
2. Click your users section
3. Click Edit Public Profile, to edit the design of the profile section of your users.
As for the content of the profile, this is managed in the menu Settings > Registration settings > Profile settings

Related Articles
User Groups Add-ons
1. Install the User Groups Add-ons The User Groups add-ons allows you to manage your users by personalizing their access rights for each section of your app. This add-ons is free. Requirements for the activation: - Authentication add-ons installed ...Authentication Add-ons
1. Activate the Authentication Add-ons 1. Go to the menu to Add-ons Store > All Add-ons 2. Scroll to the Authentication add-ons or search for it in the search bar 3. Install it from the Add-ons store by clicking on the "Install" green button. 2. ...Chat Add - ons
The Chat extension is a one-to-one messaging service. All users can send messages to each another (not photos, videos, emojis, or URLs, only plain text).* This add-on is free up to 5000 registered users (if you have more registered users, please ...Switch between User / Local Business Add-ons and In-App Purchase Add-ons
1. Switch from Users & Local Business Add-ons to In-App Purchase Add-ons In-app purchase add-ons is not compatible with the following add-ons Users: Authentications, Community, User groups, chat Local business: Loyalty card, Club card and Couponing - ...In - App Purchase Add-ons Description
1. In-App Purchase Add-ons Overview In-App Purchase add-ons allows you to sell auto-renewable subscriptions from your native apps via the App Store (Apple) and Google Play Store to monetize your app. The subscriptions will be paid and managed ...