Store Locator Extension - Map Section
Muse mBaaS Store locator extension allows you to display your store locations on your shopping app and help your clients find you easily, simplifying the shopping experience.
With this extension, you can add Map sections to your shopping app.
Install the extension:
1. Go to the menu Extensions Store > All Extensions > Store locator
2. Click "Install"
With this extension, you can add Map sections to your shopping app.
Install the extension:
1. Go to the menu Extensions Store > All Extensions > Store locator
2. Click "Install"
1. Add a Map Section
1. In the left swipe menu go to Content & Design > Content > Sections
2. Click the green button "Add a section" from the right column
3. Add a map section by choosing "Map" in the content items.
4. Give it a title
5. Click "Add"
3. Add a map section by choosing "Map" in the content items.
4. Give it a title
5. Click "Add"
2. Add a Point
1. Click the 3 dots in your sections list, then "Edit the content"

2. Click the green button "Create a point" in the main column
3. Give it a title
4. Set a location
2 possibilities:
- Fill in the address first and choose your location from the dropdown list.

If the address you are using can be geolocated by Google Maps, it will appear in the input field, and the latitude and longitude will be automatically entered.

Note: You won't be able to change the format of the address in this case, as it is managed automatically.
- Fill-in the latitude and longitude, then fill-in the address manually - without choosing any option from the dropdown list.
Note: With this method, you can set the format you want for the address.
3. Retrieve GPS Coordinates on Google Maps
1. Go to the Google Maps platform: https://maps.google.com
2. Mouse over the point on the map you want to geotag.
3. Click on the point
An information bubble will appear with the latitude and longitude of the point.
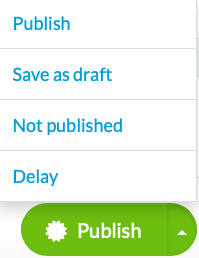
4. Publication Status of your Point
The button at the bottom right of the screen allows you to select the publication status of the point:
-Publish: Your point will be visible immediately to your users.
-Draft: Your point will be saved but not visible to your users.
-Not published: Your point will be saved but not visible to your users. This status can be useful to inform your team members that the content must be reviewed before publication, for example.
-Delay: schedule the publication time.
5. Info Tab
1. Go to the the right column and click the tab Info
2. Select the section or category where your point will appear in the app.

One same point can appear in different sections or categories displaying the same type of content.
In the example, the point will be displayed in the section Map CMS (Main categories) and also in the category 2.

3. Set your action buttons: Make a call to a phone number, or write to an email address
4. Add a link to an external website

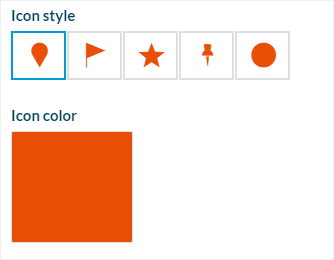
5. Set your icon style:
- choose from the different icon styles provided
or
- upload a personal icon*
6. Apply a color to your icon
*Note: If you upload a personal icon, it must absolutely follow all these requirements:
- The file must be a PNG file.
- The format must be between 150 x 150 px and 150 x 300 pixels
- The icon must be fully white (FFFFFF) and the background must be transparent
The icon anchor point must be at the center of the PNG
6. SEO Tab
1. Optional: edit the slug
2. Optional: edit default title tag
3. Optional: edit default meta description tag
7. Allow Users to Change the Distance Units
1. Add a Settings section to your app:
Users will be able to choose from this section on your app to display the distance units in miles or kilometers in the Map.
Users will be able to choose from this section on your app to display the distance units in miles or kilometers in the Map.
8. Section's Settings
1. Go to Content & Design > Content > Sections
2. Click the 3 dots next to your section
3. Click "Settings":
- Sort your points by distance, date, alphabetical order or most commented on
- Activate comments etc.
For more details about the settings menu of a section, please refer to this online help: Settings of the CMS sections

IMPORTANT:
Only the first 48 points of the map will be displayed when first opening the Map section on the app.
You need to scroll down the list to load the next 48 points in order to display them on the map.
You must repeat the process for the following 48 locations, and so on.
Only the first 48 points of the map will be displayed when first opening the Map section on the app.
You need to scroll down the list to load the next 48 points in order to display them on the map.
You must repeat the process for the following 48 locations, and so on.
Related Articles
Content Management System (CMS) Section
1. Add CMS Section CMS sections allow you to create and manage your content directly from the back office. Add a new CMS section : 1. In the left swipe menu go to Content & Design > Content > Sections 2. Click the green button "Add a section" from ...The Sections of the eCommerce App
1. Sections Management The Sections are the basis of your app. You can manage the sections of your application from the menu Content & Design > Content > Sections : The sections of your app are listed on the right side of the backend. Here you can ...Change the Distance Units in the Map Section
If you would like to change the measurement of distance in your Map section from KM to Mi, or the other way around, all you have to do is add a Settings section. From here you can set your distance units as you like.Blog - CMS Article Section
Enhance your app with a blog to showcase your products from a different angle, by writing blog posts. The Blog section allows you to showcase your products and organize a story around your shop. You can then keep in touch with your clients and ...Tawk.to Extension - Support Chat
With the Tawk.to integration for GoodBarber, you add a chat system to your app to answer your user's questions. Tawk.to allows you to instantly answer questions your customers may have. 1. Set Tawk.to chat 1. Login or Register to Tawk.to 2. Create a ...