How to use Push Notifications | Native Apps
Push notifications allow an app to notify users of new messages or events without the need to actually open the application, the same way a text message will sound and appear on the user's screen. This is a great way to interact with your users.
With the Standard plan, you can send 10.000 push notifications per month ( = 1 notification per month if you have 10.000 users, 10 notifications per month if you have 1,000 users, 100 notifications per month if you have 100 users, etc.)
With a Premium plan, you can send 30.000 push notifications per month.
With a Pro plan, you can send 250.000 push notifications per month.
And finally, Agency apps get 500.000 push notifications per month.
With a Pro plan, you can send 250.000 push notifications per month.
And finally, Agency apps get 500.000 push notifications per month.
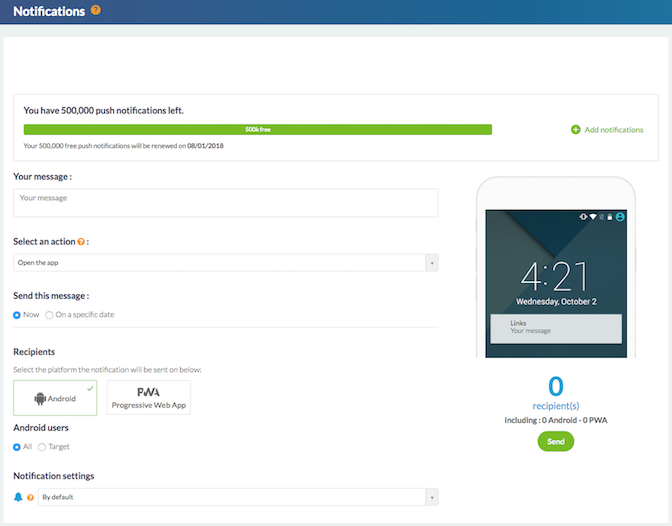
If you have reached your push notification quota, you can add supplemental notifications by clicking "Add notifications ".

Warning: Push on native apps can only be tested on the ad hoc version of your app.
1. Send a Push Notification
1. Go to the menu Notification > Push > Send.
2. Type your message into the designated field*

*A push notification is meant to be short, so the field is limited to 130 characters.
3. Select the platform the notification will be sent to.

Important: Only users who have agreed to receive push notifications upon installing your app will receive messages.

2. Action upon Opening Notification
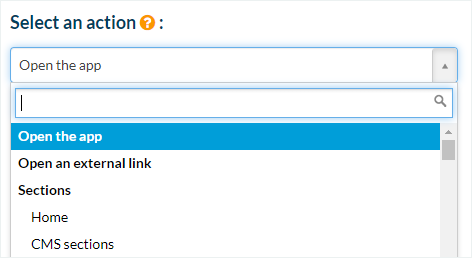
The dropdown menu "Select an action" allows you to determine the action that will take place when the push notification is opened.
For example :
- Open the application : the user will arrive to the welcome page of the application.
- Open an external link : the user will arrive in the internal browser of the application, where the indicated link will be opened.
- Select a section in the application : the user will arrive directly to the selected section.

3. Schedule the Dispatch Time
You have the option to send a push notification immediately or to delay it:
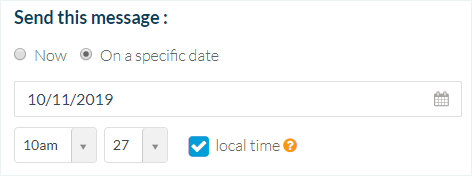
1. Select the option "On a specific date"
2. Define the date and time the push notification will be sent*.

*Check the option "Local time" if you want all of your users to receive the push notification at the same time of their days (when waking up, at lunch time, bedtime, etc.).
The notification will be sent at the chosen time and will respect the different time zones of your users.
A notification sent at 9 AM local time will be received at 9 AM for all of your users, whether they are in Paris, New York, Moscow, Tokyo...
You find notifications scheduled for a precise date in the menu Notification > Push > Schedule .

Warning: this type of notification must be scheduled at least 24 hours in advance!
It is not possible to schedule a local time push notification for the same day.

4. Target your Recipients
1. Select "All" to send your notification to all your users or select "Target" to target them based on precise criteria.

* Targeting Users:
You have the option to target a precise group of users.
Select the users according to their usage of your application :
- Users having opened your application a certain number of times in the past 30 days
- Users who haven't yet installed the latest update of your application
- Users who have never received a push notification from you
- Users who have set their device in a given language
3 options allow you to make a selection amongst your recipients based on their geographical location, their usage of your application, and the type of device they are using.

* Device targeting:
This functionality allows you to select users according to the type of device and software they are using :
- a specific smartphone model
- iOS or Android software and/or which precise version of the software

* Geolocated targeting:
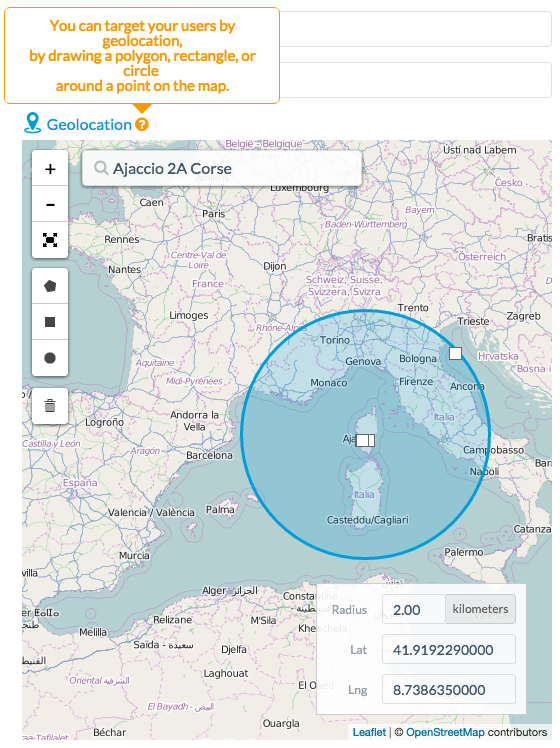
Geolocation allows you to send push notifications to users of a specific country or city (as well as the surroundings of these cities).
For this, enter the name of the city or country in the search field.
You can define the geographic zone where the notification will be sent by drawing a circle, a square, or a polygon on the map.
Attention: Users will not be targeted by geolocated notifications unless they have activated location services on their device.

5. Push Settings
Sound
You can select from the list a sound that your users will hear when receiving your push notification.
Activate the Apple badge (Premium Offer only)
Activate the Apple badge to let your iOS users know that something is waiting for them in their app.

To schedule automatic notifications, please read the online help about it.
6. Push Notification History
In the tab Notification > Push > History , you will find a list of sent notifications. They are divided into two categories:
manual and scheduled.
The history provides some information concerning your notifications :
- Messages : The title of your message
- Sender : Indicates the origin of the message (GB back office, My Muse mBaaS iOS, My Muse mBaaS Android)
- Send date : Date and time the notification is sent
- Stats : Click through rate of your notification
- Status : Colored badge indicates the current status of your notification

* BLUE: The notification has not yet been sent to the recipients
* GREEN: The notification has been sent to the recipients
* ORANGE: The notification has not been sent on one of the two platforms (either iOS or Android)
* RED: The notification has not been sent on either platform (neither iOS, nor Android).
* GREEN: The notification has been sent to the recipients
* ORANGE: The notification has not been sent on one of the two platforms (either iOS or Android)
* RED: The notification has not been sent on either platform (neither iOS, nor Android).
Related Articles
How to use Push Notifications | PWA
Standard plan (PWA only): 500,000 push notifications per month ( = 1 notification per month if you have 500,000 users, 10 notifications per month if you have 50,000 users, 100 notifications per month if you have 5,000 users, etc.) Full plan (PWA, ...Push Notifications-Troubleshooting | Native Apps
If you notice that a push was not sent out, start by checking the push history list. You can find it under the menu Notification > Push > History . If the status is green, this means that the push was sent to your users properly. If you have an ...Scheduled Push Notification | Native Apps
This feature allows you to schedule push notifications to be sent automatically when new content is published in a specific section of your app. This is a different feature than the regular push, which allows you to send pushes manually one at the ...Push Settings on Users Side | Native Apps
1. Install the Authentication Extension 1. Go to the menu Extensions Store > All extensions 2. Click "Authentication" extension. 3. Click "Install" 2. Push Notifications History Users are able to see push notifications history in their profile page. ...Scheduled Push Notifications | PWA
This feature allows you to schedule push notifications to be sent automatically when new content is published in a specific section of your app. This is a different feature than the regular push, which allows you to send pushes manually one at the ...